J2EE application using Eclipse + Tomcat 6
J2EE application using Eclipse + Tomcat 6
Following is the steps to configure tomcat in Eclipse. Afterward reading this article you will be able to launch your J2EE Applications from eclipse and debug them.
Requirements :
Eclipse IDE for Java EE Developers
Tomcat 6.0.x
The steps to follow are:
- Download Java 7 SDK
- Download Eclipse IDE for Java EE Developers
- Download & Install Tomcat 6
- Configure Eclipse to use Java 7as the Runtime
- Configure Eclipse to use Tomcat 6
- Creating a WEB EE Dynamic Project
Download Java 7 SDK
You can downolad Java from here.
This will download an executable file. Execute it and follow the wizard steps.
You can downolad Java from here.
This will download an executable file. Execute it and follow the wizard steps.
Download Eclipse IDE for Java EE Developers
You can download Eclipse IDE for Java EE Developers (aka Helios) here.
This download is also an executable file. Run it and follow the wizard steps.
I would highly recommend to take a look at this page (Eclipse documentation) for those that never used this software before.
Download & Install Tomcat 6
You can download Tomcat 6 from here
In this case I recommend downloading the zip version of it. Once it is download what I do is to unzip the file to a directory in the main drive, for example: c:\Tomcat6
Configure Eclipse to use Java 7
Once Eclipse is running (you should now how to start eclipse by now) we go to the Menu and select:
Window — Preferences, then you-ll see the following screen:
Then browse in the left panel: Java — Installed JREs and then click on the right button “Add…”
You’ll be prompted with a screen to select the type of JRE you want to add. In that screen select “Standard VM” and click Next. Then you’ll get to another screen where you will have add the information related to your JRE environment (the one you just downloaded on step 1):
JRE Home: directory depends on where you installed your Java JDK in step 1.
JRE Name: any valid name.
JRE Name: any valid name.
Click on finish and you are done, now you can use this JRE in your Java projects within this Eclipse setup.
Configure Eclipse to use Tomcat 6
Within Eclipse go to the Menu and select:
Window — Preferences, then in the window preferences browse: Server — Runtime Environments. Then click on the right button “Add…”
Window — Preferences, then in the window preferences browse: Server — Runtime Environments. Then click on the right button “Add…”
In the followin screen you can choose and configure the Tomcat Application Server you just installed in step 3:
Click on Next to continue with the Server Configuration:
Name: Give it a name to identify your server within Eclipse
Tomcat Installation Directory: Location where you unzipped your tomcat on Step 3 (c:\Tomcat6)
JRE: Choose the JRE we just configured in the previous step (4)
Click on Finish and you are ready to create your first J2EE Dynamic Project in Eclise.
Creating a WEB J2EE Dynamic Project – Eclipse
Create a new Project in Eclipse within the project Explorer View in the Left panel by right-clicking on the panel and select New — Project…:
Create a new Project in Eclipse within the project Explorer View in the Left panel by right-clicking on the panel and select New — Project…:
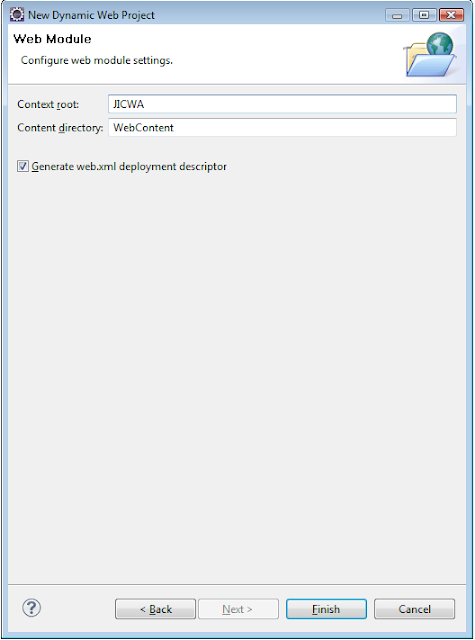
After selecting the “Dynamic Web Project” and clicking next, we need to fill in some information:
Step 1:
Step 2:
Step 3:
Then we click on “Finish” and our project will be ready.
Note: as you can see in the second step, there is a Configuration section where you need to select the Application Server you want to use. In this example I will be using Tomcat 6 configured previously in this post.
Note: as you can see in the second step, there is a Configuration section where you need to select the Application Server you want to use. In this example I will be using Tomcat 6 configured previously in this post.
Your project is ready:
The name “Jaime’s Ideas – CWA” has an explanation. I am using this project to explain something else related to SDL Tridion CWA Framework.
Next thing will be to create a JSP page and run your Project/J2EE application. Right-click over the WebContent folder select New — JSP File and give it a name, for example index.jsp. Then write “HELLOW WORLD” within the body content of your file.
Now you can run your JSP by right-clicking over it (index.jsp) and selecting Run As — Run on Server. Now you will see the Server configured before, in the available servers for running:
Click on “Finish” and you will be running your JSP:
Now you are able to start working on J2EE application using Eclipse + Tomcat 6 + Java 7.


0 comments:
Post a Comment